Tegelzetter
Writing our own window tiling extension Fedora 43 with GNOME to gain a better understanding of what’s happening under the hood
Check out the Repo
This post is intended to serve as a sort of personal documentation to track the reasoning, logic, and processes involved in the creation of tegelzetter. There are two main points to this project: (1) regain the tiling capabilities I had hacked together for myself on XFCE4 and (2) Gain a deeper understanding of how GNOME and Wayland work under the hood. Keep reading if this is of interest to you. Please see the README for installation and usage instructions.
I recently made the switch from Debian Bookworm with XFCE (X11) to Fedora 43 running GNOME (Wayland). I decided to make the switch for a variety of reasons, but it’s still a massive shock to the system. I’m experienced with Linux, but I hadn’t used Fedora prior to this new install and I hadn’t used GNOME for well over a decade. Now I’m trying to recreate the workflow I’ve developed using X11 with Wayland. This is much easier said than done (or maybe it’s easier done than said– that remains TBD). Considering the approach needed with Wayland is entirely different, it sort of feels like I’m back to square one.
Custom Window Tiling
One of my favorite scripts I wrote for my XFCE environment was my custom window tiling bash script. I have one of those big dumb ultra-wide monitors to gain the real estate of two separate monitors without an unsightly seam in the middle. It definitely looks great, but there are a few caveats with default options. With two separate monitors, I can tile windows down to much smaller fractions of the total desktop. With one giant monitor, I can really only make windows fill up the entire monitor, which is ridiculously useless for most applications, or split the screen in half, which is just the equivalent of a full screen on a standard monitor. It’s extremely limited. I had a solution1, and (un)lucky for me, X11 exposes just about everything and makes this stuff relatively easy.
# This script will separate the monitor into 8 regions, 4 on
# the top half of the screen and 4 on the bottom, with each
# given a letter signifier representing a physical mapping of
# a keyboard, like so:
#
#     -----------------
#     | Q | W | E | R |
#     |---------------|
#     | A | S | D | F |
#     -----------------
#
# Additionally, there will be 4 more regions with 100% height,
# from left to right:
#
#     -----------------
#     |   |   |   |   |
#     | H | J | K | L |
#     |   |   |   |   |
#     -----------------
#

...
Fig 1: comment blurb from window-tiler.sh
It’s not entirely too difficult to leverage tools like xdotool,
xrandr, xwininfo, and wmctrl to manipulate windows across multiple
monitors using bash. I was able to write a script that manipulated
windows into 12 different positions depending on which flag is
passed and assign each to a keyboard shortcut. A simple
[super]+Q will tile the current window to the top left
at 1/8 the screen size. I had spoiled myself. Controlling the
position of my windows had never been easier. Unfortunately, these
tools only work with x-server. Wayland is a different beast and it
doesn’t seem like any of the available GNOME extensions really do
what I want. I also would like to avoid building up a giant stack of
extensions that only partially solve my problems while expanding my
attack surface.
The only way I’m going to be able to achieve similar results using GNOME is if I can figure out what’s going on under the hood with Wayland. Wayland, and GNOME by association, has strong boundaries and access lower level functionality isn’t quite as straightforward as XFCE and other X11-based DEs. XFCE is meant to be hackable whereas GNOME abtracts a lot of that away from the user.
GJS
Wait. What’s this? Javascript? To interface with my DE? Really?
Yes, really. And no, it’s not like the DE is wrapped with Electron. GNOME is not controlled by any browser in any way. Don’t be silly.
There are technically other ways that this functionality
can be accomplished. For example, using tools like gdbus bus, the
org.gnome.Shell.Eval method, and enabling unsafe-mode in GNOME’s
Looking Glass debug tool2 can readily handle
window management. I’m intentionally not going to go this route, but
it’s worth mentioning so I can explain why it’s a bad idea.
Eval allows for arbitrary code execution inside GNOME
Shell. That’s bad. It completely bypasses normal controls
imposed by GNOME. Any process with access to the session bus can
wreak havoc. It’s more of a hacky backdoor to the window manager
than it is a solution that should be used longterm. While it would
likely be much more convenient and simpler to use Eval,
we need some boundaries. We’re going to go the official route
suggested by GNOME: using GNOME’s API with GJS.
I’m not going to lie. This concept is totally new to me, but GNOME has been officially using JS for about 15 years now (as of 2026). Some of you that are more experienced with GNOME are probably groaning at this, but I come from the land of modular config files with each customization requiring a different set of tools and varying syntaxes.3 The more I read up on this the more I think I may actually really appreciate a more ‘monolithic’ approach with everything accessible through a single API and a single language. I’m not totally sold yet though. I fully expect it to prove difficult to make an extension that works smoothly. What I mean by that is: Wayland and GNOME on Fedora is restricted by design.
When it comes down to it, JS is just another scripting language. The security of a given environment isn’t really dependant on what language is used. What really matters is the permissions a given script/plugin/extension is given, where it runs, and how it runs. Writing an extension that uses the GNOME Shell’s API is highly privileged code. It runs inside the compositor and has full authority over the desktop session. It can potentially expose quite a bit4, so the delivery mechanism is really important here.
GNOME JavaScript (GJS) extensions are loaded from the local disk, owned by a single user, and run inside the GNOME Shell. None of the code is ever loaded dynamically, so most of the vulnerabilities associated with JS5 aren’t really an issue with GJS. Regardless, we must be extremely diligent about what extensions we choose to install on our system considering the permissions some are granted. Trusted sources only! This is one of the major reasons that we’re just going to write our own.
The Planning Stage
Tegelzetter is Dutch for ‘tiler’, as in a tradesman who tiles a floor. No, I don’t speak Dutch, but Tegelzetter is fun to say and this is a window tiling extension. Alright. Now that the silly naming part is out of the way, let’s hash out exactly what we want this extension to do and figure out exactly how it can be accomplished.
The original script that I used on XFCE was relatively simple. I would identify which panel has focus, determine what monitor it’s on, and tile to the specified location and size depending on which flag was passed through. Then, I tied different script calls with the various flags hard coded in to keyboard shortcuts. It worked fantastic if I was only using my laptop & the ultrawide monitor, but if I ever wanted to add another monitor into the mix, a bunch of edge cases started to creep up and it misbehaved. I want to fix all of that as well as add some additional functionality into this new GNOME extension. I’m imagining something with the same fractional tiling, but include better dynamic monitor awareness and the ability to enter a ‘window editing’ mode to resize the focused window purely through keyboard input. I’m taking heavy inspiration from tmux and pure tiling WMs. I could simply just use a tiling WM, but I want to retain the floating functionality of GNOME as well.
Logical Flow

Security Considerations
One of the security issues with X11 is that it exposes
everything by default. We want to avoid doing that here and
removing any boundaries. This is the same reason we’re not directly
using Eval. In order to accomplish this, we’ll use a
restricted D-Bus API. Basically, we’re only
exposing specific D-Bus functionality to private
functions in an internal script, and any keyboard input will be
filtered to only allow only for very specific actions to be taken.
This approach avoids exporting dangerous power and
seriously reduces the attack surface. With Eval, an attacker can
inject arbitrary JS, enumerate windows, keylog, or even crash GNOME
itself. With the restricted D-Bus API, an attacker is basically
limited to functionality inherent to the extension. Even if the
caller is malicious, the worst-case scenario is bounded. The
restricted D-Bus API allows for textbook least-privilege:
only granting access to what is necessary.
Usage
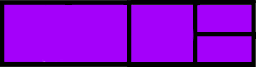
The goal of this project is to create an environment that can offer an efficient workflow. With only a few key bindings, windows can be tiled quickly into configurations like the example below:
Key Bindings
Key bindings are assigned to physically reflect the position on the screen being targeted to make it easier to remember. Starting from the top left of your keyboard, the first four keys are Q, W, E, and R. These keys are mapped to the top 4 positions at 50% screen height and 25% screen width. A, S, D, and F are mapped to the bottom four positions and H, J, K, and L are mapped to the 4 positions at 100% height and 25% width. See the table below.
| Binding | Result |
|---|---|
[ctrl]+[super]+q |
 |
[ctrl]+[super]+w |
 |
[ctrl]+[super]+e |
 |
[ctrl]+[super]+r |
 |
[ctrl]+[super]+a |
 |
[ctrl]+[super]+s |
 |
[ctrl]+[super]+d |
 |
[ctrl]+[super]+f |
 |
[ctrl]+[super]+h |
 |
[ctrl]+[super]+j |
 |
[ctrl]+[super]+k |
 |
[ctrl]+[super]+l |
 |
Fig 4: Key binding table
Writing the Extension
Writing the extension proved to be much more complex than my
previous bash script on XFCE4 written in a single file. First, I had
to learn about how GNOME extensions are written.
ChatGPT honestly helped to clarify things quite a bit. I learned
about GNOME’s Looking Glass tool as well, which allowed me to
manually inspect the directories of extensions loaded in my system.
The Looking Glass tool can be used by opening GNOME’s command dialog
with [alt] + [F2], typing lg
and pressing [Enter].
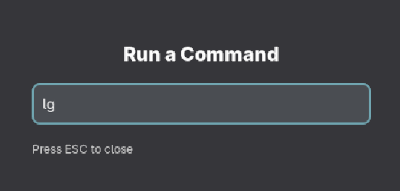
Within the Looking Glass, select Extensions in the
top right and View Source under a given extension to
view it’s source files. After a lot of reading through source code
and documentation, I was able to wrap my head around how these
things work. Well, I was able to figure out just enough to get
started.
Creating the Root
The first thing we need to do is create a root folder for this
extension. It’s eventually going to get placed in
~/.local/share/gnome-shell/extensions/, but I’m just
going to create a working copy in my user’s ~/bin/
directory.
cd ~/bin/
mkdir tegelzetter && cd tegelzetter
To be completely transparent, this isn’t exactly how I did it. I
created a repo on github first. Then, I cloned that repo in my
~/bin/ directory with:
cd ~/bin/
git clone git@github.com:palmer-sec/tegelzetter
This is definitely the better option if you appreciate version control. This way, I’m set from the start with git and can add, commit, and push any changes I make directly to my repo with:
git add .
git commit -m "commit message"
git push
It’s as easy as that6. Alright, now we have an empty directory7. Next we need to start adding some files.
Metadata
Next, we need to add is our metadata.json file. This basically provides the name of the extension, its UUID, a description, what GNOME Shell versions it’s compatible with, and the version of the extension being written. Notice that the UUID contains both the name and a domain, in this case palmersec.com. A full domain name isn’t required, but it’s generally a good idea to avoid collisions and infer ownership. It doesn’t even have to be a real website like palmersec.com, but if you use any arbitrary dictionary word, take the time to look and make sure there aren’t any existing GNOME extensions using it.
vim metadata.json{
"uuid": "tegelzetter@palmersec.com",
"name": "tegelzetter",
"description": "Tiling + resize-mode with a restricted D-Bus API.",
"shell-version": ["49"],
"version": 1
}Setting Up the Keybindings
We need to write a quick configuration file to ‘lay claim’ to the
keyboard shortcuts we’ll be setting up for our extension8. This is an XML file that will
go in the schemas/ directory.
mkdir schemas && vim schemas/org.gnome.shell.extensions.tegelzetter.gschema.xmlI’m not going to post the entire file here, it can be found in
the github repo, but I do
want to touch on some details. Below, you can see the general
framework for the file with a single keybinding assignment. It
simply uses the ‘key’ tag with ‘name’ and ‘type’ attributes. Notice
the section inside square brackets:
["<Control><Super>q"]. This
is the actual key assignment of
<Control><Super>q, but we use escape
sequences to avoid any issues with XML syntax. If you check out the
file in its entirety on github, you’ll notice that this line
defining the keybinding for
<Control><Super>q is simply repeated,
changing only the key assigned and its name.
<?xml version="1.0" encoding="UTF-8"?>
<schemalist>
<schema id="org.gnome.shell.extensions.tegelzetter"
path="/org/gnome/shell/extensions/tegelzetter/">
<!-- 12 tile bindings -->
<key name="tile-q" type="as"><default>["<Control><Super>q"]</default></key>
</schema>
</schemalist>It’s important to note that this XML file is only a
source that must be compiled with
glib-compile-schemas. We will include that in our
Makefile further down the line.
Tiling
This next file is essentially the same logic as my old XFCE
tiling script rewritten to function with GNOME’s work area as
opposed to xrandr offsets. It’s a set of functions outlining the
logic and math needed to get the current window, calculate the
dimensions of the current monitor, divide that monitor into
specified rectangles, and tile the current window to a specified
size/location. These functions can be found in the github repo. Pay particular attention
to computeTileRect(workArea, key) to see how different
rectangles are computed.

Restricted D-Bus API
Okay, now we’re getting into the good stuff. As previously mentioned, using a restricted D-Bus API seriously reduces the attack surface when compared to X11. We’re going to talk about (1) What exactly that means, and (2) How to implement it.
What is D-Bus?
According to the GNOME JS Guide, “D-Bus is a messaging system
that can be used to communicate between processes, enforce
single-instance applications, start those services on demand and
more.”[3] I’m not going to do a deep dive into D-Bus. This isn’t a
D-Bus article. Just know that D-Bus is a messaging bus between apps,
each other, and the GNOME Shell. A restricted D-Bus API simply
exposes only the necessary functions from the GNOME Shell
with GJS. The tiling.js file from the previous section
runs inside the GNOME Shell, while dbus.js
opens up a ‘secure line of communication’ with the script through a
restricted interface to selected functionality. It could
almost be thought of as a proxy that only allows very specific
requests to be made.
How do we write a restricted D-Bus API?
Mode Toggling
The Glue That Holds It All Together
Resources
[1] About Gjs. GNOME JavaScript. (n.d.). https://gjs.guide/about/#cool-what-is-under-the-hood
[2] Architecture. GNOME JavaScript. (n.d.-a). https://gjs.guide/extensions/overview/architecture.html
[3] D-Bus. GNOME JavaScript. (n.d.-b). https://gjs.guide/guides/gio/dbus.html
[4] Knokelmaat. (2024, December 1). Gnome extension keyboard shortcut. GNOME Discourse. https://discourse.gnome.org/t/gnome-extension-keyboard-shortcut/23581/4
[5] Meta.window.move_resize_frame. Mutter. (n.d.). https://mutter.gnome.org/meta/method.Window.move_resize_frame.html
[6] Payne, & Ptomato. (2020, December 25). Get dash instance when creating Gnome Shell extension. Stack Overflow. https://stackoverflow.com/questions/65442497/get-dash-instance-when-creating-gnome-shell-extension
[7] Wikimedia Foundation. (2025a, December 8). Gnome Shell. Wikipedia. https://en.wikipedia.org/wiki/GNOME_Shell
[8] Wikimedia Foundation. (2025b, December 28). Mutter (software). Wikipedia. https://en.wikipedia.org/wiki/Mutter_(software)
I’m not going to bother posting the entire OG X11 script here. Technically, it’s deprecated since I no longer maintain it, although it was never really public. The entire point of moving to Wayland is to gain better security, so we’re just going to leave this one in the past. Additionally, it’s a very niche script that worked for my specific use case and it leaves a lot to be desired.↩︎
Looking Glass can be accessed by typing
Alt+F2& typinglg.↩︎Is ‘syntaxes’ a word? I’ve never pluralized it before and I’m writing this in vim without any sort of spell-check. Spoiler: the internet said it’s a word. phew.↩︎
Direct control over your DE using JS can expose window focus, keystrokes, application metadata, screen geometry, and more↩︎
Javascript running dynamically in browsers can open up XSS & CSRF vulnerabilities if input is not properly sanitized. Additionally, a sort of ‘dependency hell’ can quickly surface with some of the JS frameworks out there (react, etc). This isn’t really much of an issue with GJS. It’s a completely different system that just so happens to share the same language.↩︎
Well, don’t forget to set up SSH access to your github accordingly if you want secure access.↩︎
Well we have either an empty directory or a new repository with only a license and README if you’re a responsible person.↩︎
NOTE: When setting up keyboard shortcuts, do yourself a favor and make sure they don’t collide with any existing keybindings↩︎